Quickstart
This guide will get you all set up and ready to use the BoiledSaaS Chrome Extension template. We'll cover everything you need to initialize and start customizing your application.
Before you can get started you'll need to have purchased and gained access to the BoiledSaas Github Repository. If you haven't done so yet purchase here. Then check your email inviting you to join the Github Repo.
Clone the Repository
After purchasing your license you will automatically receive an email inviting you to the repository.
The repository includes a chrome-extension folder as well as a webapp folder.
# Ensure you have git installed
git clone https://github.com/<private_repo> project_name
git remote remove origin
cd project_name
Configure Environments
This project includes a chrome extension with a web app to handle payments and authentication.
Run the following in a split terminal. To setup the chrome extension:
cd chrome-extension
npm install
To setup the webapp:
cd webapp
npm install
Environment Variables
webapp: rename.env.exampleto.env.localchrome-extension: rename.env.exampleto.env
Configure Supabase
- Create a free Supabase Account.
- Navigate to
[Project settings] [API]and locate the Project URL and Anonymous Key. - Add these keys into the
.env.localand.envfiles you created earlier. - Navigate to
getting-started/supabase.sqland copy and paste the script into the Supabase SQL Editor. This will create the neccessary database schema for the project.
Stripe Webhook
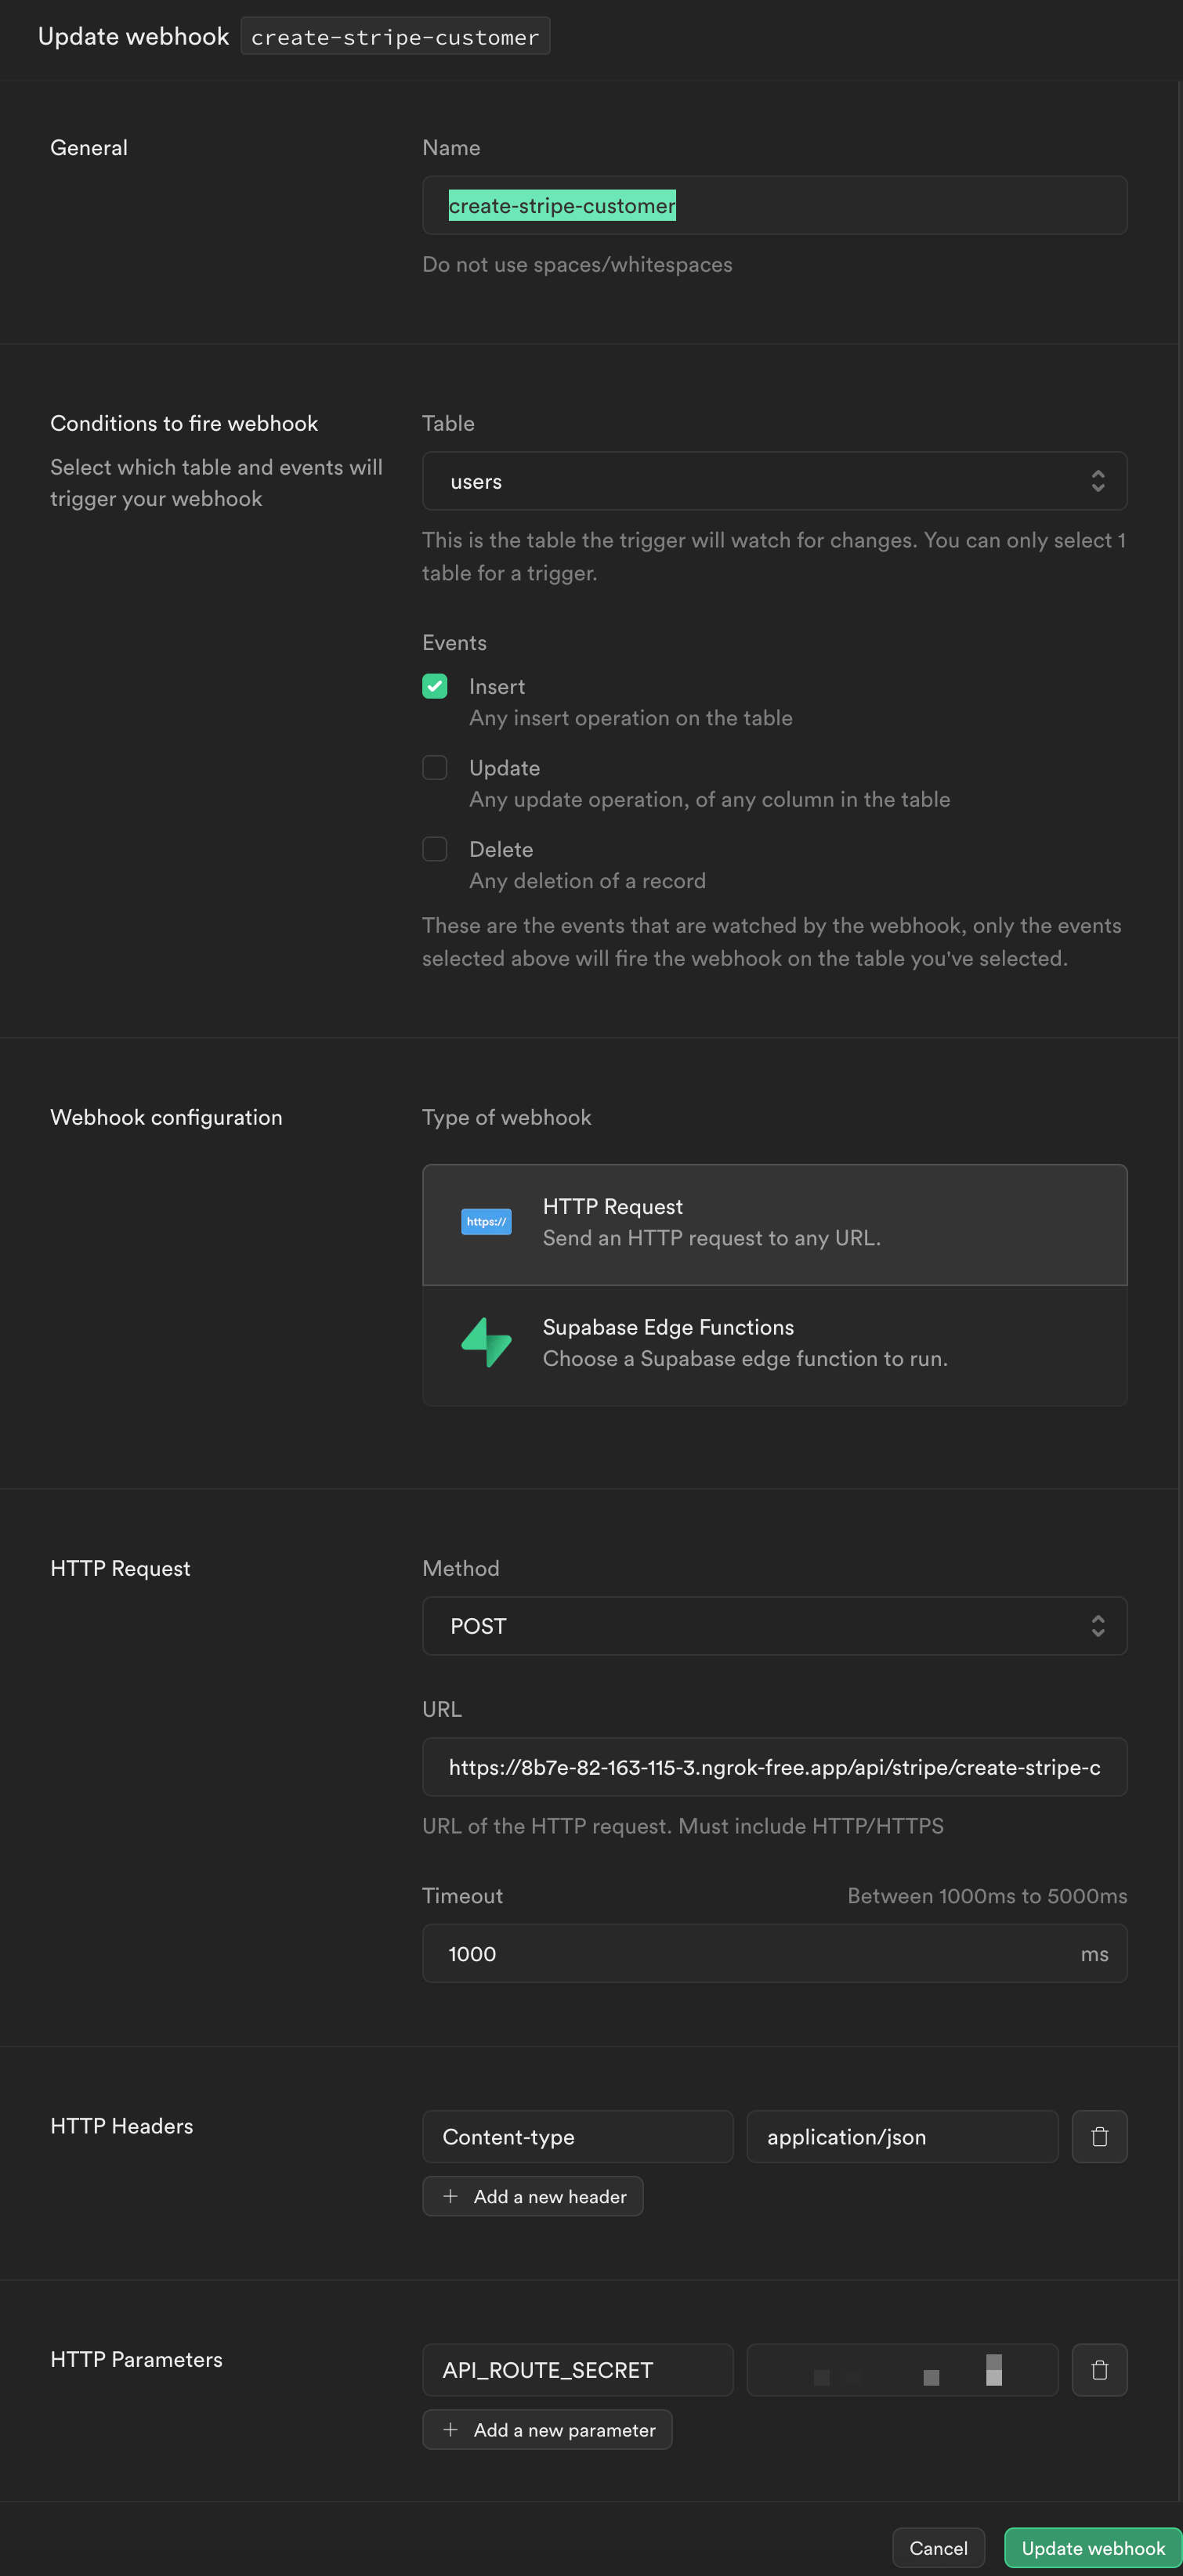
When a user signs up we need to trigger a webhook on our webapp to query Stripe, create and add a customerID to the users row in Supabase.
- In the Supabase Dashboard navigate to
[Database] [Webhooks]. - Create a new hook called
create-stripe-customer. - It should be fired on
INSERTevents, on thepublic.userstable. Do not use theauth.userstable here. - This should be a POST request to the following URL:
https://<your-app-url>/api/stripe/create-stripe-customer. While in development make your localhost publicly accessible using Ngrok free. - Finally for extra security we want to ensure the requests reaching our webhook are trusted. Add a HTTP Parameter called
API_ROUTE_SECRET. Generate a random key here. Be sure to add the value to your webapps.env.local.
Configure Stripe
- Create a free Stripe Account.
- While in test mode navigate to Stripe Dashboard.
- Create an endpoint and set the project URL to:
https://url-of-your-application/api/stripe/webhook. - Add the following events: customer.subscription.deleted, invoice.paid, invoice.payment_failed
- Copy the Webhook Signing Secret key and the Stripe Secret Key then add it to your
.env.localfile. - Add your products and pricing structure to your desire. The pricing section and payment gateways are generated from the
webapp/config.tsfile. Add the priceID for each product to this configuration.
  plans: [
    {
      title: "Basic",
      currency: "$",
      price: "5",
      type: "month",
      description: "Ideal for small-size businesses to larger businesses",
      features: ["Everything in Basic", "100 Builds", "Progress Reports"],
      stripePrice: "price_XXXX",
    }
  ]
Run Locally
Chrome Extension
- In the chrome extensions root directory run
npm run dev. This will generate a dist folder. - Navigate to chrome://extensions/.
- Select
Load Unpackedand select the generateddist folder. - Chrome will automatically track local changes in this folder once your run
npm run devso you don't need to keep uploading the package on every change.
Webapp
The webapp needs to be running at the same time as the chrome extension so faciliate authentication and billing requests. To run this locally navigate to it's root directory then run, npm run dev.
Deploy to Production
Chrome Extension
- Create a Chrome Store Developer Account.
- Compress your
distfolder. Note: some versions of macOS built in compression corrupts this step. If this happens to you use an online compressor like: Ezyzip. - Upload the .zip folder to the developer dashboard and add the required media.
Webapp
- Ensure you have filled out all the neccessary Enviornment Variables in
.env.local. - Disable 'test mode' in your Stripe Dashboard. Be sure to create the webhook and produces in 'live' mode.
- Copy the new Stripe priceIds, Secret Keys and Webhook key to your deploy enviornment which you can choose from below:
Deploying your application is easy and supported by a range of hosting providers. Check out these guides on the following:
- Deploy on Vercel.
- Deploy on Heroku.
- Deploy on Netlify.
- Deploy on AWS Amplify.
What's next?
Great, now you're application is setup and running here are some helpful guides and tips to help you get more from your BoiledSaas boilerplate.